Thursday, September 3, 2009

Making bookmarks for some very special people...


Yesterday my husband and I and several friends had the lovely occasion to meet the sweet Sisters of the Poor Clares in St. Julians at a get-together organized by the same nuns. We are indeed very happy and fortunate to be able to spend such precious time with them. They always bless us with their welcoming and warm friendship.

The bookmarks were a joint effort/idea made
as a gift for the Poor Clares
~ thanks to all who shared ideas or donated supplies
so that I could make these ~
...here are pictures of the work involved in making them
for those who would like to try making some.


I measured, cut and knotted (on one end) some lovely colourful ribbons, donated by some friends, ...


It was hard to choose from such a lovely variety of crosses...these were generously donated and sent from America by some very dear on-line friends.


The next step was the most difficult...threading the ribbon which is a bit fidgety but I improvised with a home made tool ... a short length of silver wire bent in two to thread the ribbon with!

With my family's help I found a way how to leave one side of the ribbon longer than the other while securing the cross so that the final knot does not show behind the bookmark.


Once I designed the bookmarks I printed them...hmmm, that was when the printer ink finished...anyway I finally got them printed.

The next step was to laminate them.


I love the laminating part...this is when the design part is all done and ready and you can finally see the end result...


A paper cutter is a very helpful tool when you have to cut out some three dozen bookmarks and trim them!


Using a hole punch, make a hole in the middle at the top of each bookmark.


This was also a fun part...threading the ribbon and cross ... here comes the part where you will find out that the knot stays at the back because of what we did earlier when we threaded the ribbon and cross having left one side a little longer than the other.


Here is a close up of the bookmarks.


It took quite a long time (at least 8-10 hours spread over different days) to design (having tried several different designs), to print and then do all the steps above to make these bookmarks.

It was well worth making the bookmarks to see the smiles on the sisters' faces.


Here is the wording on the bookmarks:

"Start by doing what's necessary; then do what's possible; and suddenly you are doing the impossible." ~ St. Francis of Assisi ~

"Praise God by Your Life" ~ St. Clare ~



Thank you Lord for the precious gift of
the Poor Clares who daily offer their
prayers for each and every one of us.


Sunday, August 30, 2009

Another idea for a recycled paper bag


Would you like to decorate another paper bag, let's get everything ready...


You will need:


  • Your 'free' paper bag (we now have paper bags galore instead of the usual plastic ones),

  • acrylic paint (any colour),

  • small paint brush,

  • a few drops of water,

  • mixing bowl and plastic spoon,
  • piece of cardboard to try out stamp,
  • scissors,
  • hole-punch,
  • ribbons,
  • something to print with, I used the bottom of an empty water bottle...


Are you ready, let's go...


Having mixed some of your acrylic paint into your mixing bowl, add a few drops of water and mix thoroughly with a spoon (not like I did with the brush as I got it too loaded with paint...I was in a rush to make a sample to take it to the centre while also trying to take photographs single-handed ~ talk of multi-tasking!)


Now load your brush with paint and paint the (outside of the) bottom of your water bottle...use several coats of paint to cover this area well...mine was super loaded LOL!
You can try stamping your design on a piece of cardboard first before stamping on your bag.


When you are confident that your design is looking good, start stamping on your bag. Do not overlap designs unless the first ones have dried. Use your imagination and enjoy your stamping. If you have something else you could stamp with, experiment...you will find there are loads of things around the house you could stamp with.


KIDS: Please ask an adult for permission to use whatever you have chosen as your stamp.


Stamp your pattern all over the bag.


Do not overload your stamping medium so that you will get a uniform pattern...you can see I did just that except towards the right of the picture just to show the difference ;)


Let the paint dry thoroughly before stamping the other side.


Once totally dry, use a punch to make holes along each edge of the bag.


Open the fold on one side and start threading your ribbon from one hole down to the next one along the side (not from front to back flaps as that will close up your bag).


Make a bow or tie...depending on whatever you choose to make, cut equal pieces of ribbon to complete this added feature.


Do the same all along each side, front and back.


And there you have it, another pretty recycled bag


Enjoy!


Wednesday, August 26, 2009

How lovely ~ another Award!!!


A Big THANK YOU goes to my sister again for yet another lovely award and I really love this one as it has the word Kreativ in it : )
Hop on to her blog CraftySusie
Sue has such great talent and she is always
so generous in sharing her ideas and her work.


Thanks Sue! I am honoured to receive this award.


There are a few rules that come along with this award. To accept the award I have to do a few things:
1. Thank the person who nominated me for this award.

2. Copy the logo and place it on my blog.
3. Link the person who nominated me for this award.
4. Name
seven things about me that people might find interesting.
5. Nominate seven blogs.

6. Post links to the seven blogs that I nominate.

7. Leave comments on all seven blogs letting them know I nominated them.

Now here comes the difficult part since all the blogs I follow merit this award in some way or another but I have to make a choice so here goes...

Red Mommy Crafts
Crafty This and That
Th-Ink-ingofyou
Daisy Soap Girl
The Soap Barn
Bran Made Tags
Tammi's Recipe Box


Well, here are the 7 interesting (I hope) things about me...
  1. I collect thimbles and teapots.
  2. I will try any craft, at least once.
  3. I love watching clouds and stars (a dreamer maybe) : )
  4. I hate noise, crowds and loud music.
  5. I always dream of having a house by the sea or a lake.
  6. I used to play the guitar in my teenage years and also wrote my own songs.
  7. I have written a poetry book which I am hoping to publish one day, hopefully soon!

CONGRATULATIONS ~ ENJOY YOUR AWARD!


Friday, August 21, 2009

Healthy Tomatoes with recipe for Tuna Stuffed Tomatoes


TOMATOES
are plentiful at this time of year and although the prices are fluctuating, it is definitely one of the best foods to include in our everyday diet.

Tomatoes are actually a fruit and not a vegetable...read here all about The Amazing Health Benefits of the Tomato


Here is a recipe I made recently:

TUNA STUFFED TOMATOES

INGREDIENTS:


  • 8 large round tomatoes, washed, dried, halved and seeds removed
  • 2 -185gr cans tuna (water or oil packed) drained well
  • 1 - 2 anchovy fillets cut into small pieces (Optional - you many want to leave these out if cooking for children)
  • 1/2 cup of fresh breadcrumbs
  • 8-10 preferably black olives chopped (I used green)
  • 3 black olives sliced for garnish
  • dash of Worcestershire sauce
  • 2 teaspoons of fresh mint or basil washed, patted dry and chopped
  • drizzle of olive oil
  • some capers for garnish
  • Optional: 2-3 tablespoons of Mayonnaise


Prepare your tomatoes on a large platter. Scoop out some of the pulp and reserve. Cover or refrigerate tomatoes until you prepare the mixture for stuffing. Flake tuna in a medium bowl, add all other prepared ingredients, mix well. Add the reserved pulp cut up into small pieces. At this point you could mix in the mayo if desired. Spoon generously into prepared tomatoes, add olives and capers for garnish. Refrigerate for a couple of hours. Serve on fresh lettuce with crusty bread or crispbread.

NOTE: You could also add a chopped hard-boiled egg to the tuna mixture.

Tuna-Stuffed Tomatoes are fresh and light, and make a great main course for lunch or can replace a salad at dinner.


Enjoy!

Edited August 22nd, 09: For those who have already read the recipe, please note I have adjusted it adding the scooped out tomatoes to the filling mixure and the optional mayo as one of the ingredients...these will make it more moist. Sorry I forgot to add them in the first place. Alternatively you could also add more olive oil if it is too dry. Let me know if you try this recipe : )


Monday, August 17, 2009

Magic Moments


NOTE: Please switch off the music on my blog before viewing/listening to the video

I came across this presentation of the wonderful Perry Como singing Magic Moments recorded in 1957 and thought of sharing this lovely song with you.
I was only a few years old when it hit the charts and I remember it was a popular song for many years; in fact it was one of my Mum and Dad's favourites.
With music by Burt Bacharach (my Dad's favourite composer) and lyrics by Hal David, it was one of the first compositions by this duo.
It was interesting to know, through a search I made, that Bacharach began his career as a conductor and arranger, and toured widely for three years as accompanist-conductor for the legendary Marlene Dietrich beginning in 1958...hmm, I had not even started school then so I don't think it is something I would remember : )
The arrangement is the magical part of this song, with 4 sopranos, 1 alto, 3 tenors, 1 baritone, 1 bass, celeste and bells, guitar, bass and drums, and bassoon !
And I love the whistling part too : )
All I have to say is that hearing it again has brought back some wonderful old-time feel-good Magic Moments...PC's voice is certainly smooth and silky and hearing his songs always reminds me of Christmases past with all the sweet smells of baking and the aroma and happy feel of 'home'!

The background in this video is mostly made up from vintage 1950's photos.

Enjoy!


CREDIT I would like to give credit and thanks to Moonbeam001 for putting up this video presentation.


Wednesday, August 12, 2009

The Perseids are here!


During the Lija fireworks on the night of 5th of August - a bright and clear shooting star was seen over Birkirkara from the north side - it seemed so near and the colour was amazing - all of us watching the fireworks saw it and at first we thought it was part of the fireworks...but soon we realised it was not from the fields where the display was being set off. Actually the flame came right through the sky, it was beautiful to watch.

This year's Perseid meteor shower, known to many as the Tears of St. Lawrence, or Dmugħ ta' San Lawrenz, will peak on Wednesday-Thursday night and taper off till about August 15th.

Earth is still inside the debris stream of Comet Swift-Tuttle and, as a result, the Perseid meteor shower is still active. So if it's dark where you live, go outside and look for meteors. Try to avoid other sources of light in order to get the best views. Moonlight will interfere with the display, but not ruin it. Face away from it and look towards the northeast.

Not every light that streaks across the night sky is a Perseid. Some of them could even be spy satellites!

The Astronomical Society of Malta is holding an observation session at Irdum tal-Madonna, L-Ahrax, limits of Mellieha, starting at 9 p.m. today Wednesday. The public is invited to attend.

Wherever you are I hope you will be able to catch a few of the hundreds that will be visible.

Enjoy the spectacle!


P.S. Here is a link to some photos (3 pages) of the meteor shower of this year:

http://spaceweather.com/meteors/gallery_12aug09.htm


UPDATE: Just before going to bed last night or early this morning since it was around 2am, I rolled up our bedroom blind to get a better view of the skies from our bed and I was thrilled to see one more shooting star (could be two as they were going in different directions but close together). My son also saw another two at around the same time. So I guess it was worth the wait.
Around 5am this morning, I was up and looked at the skies again. I could see the early light of dawn and nothing was moving at first, then I think I saw some flashes of light but I don't know whether it was just my sleepy eyes or whether I had been dreaming!

I do hope many of you were able to see part of the meteor shower ~
It is when we notice and appreciate these things
that our everyday life becomes an adventure!

Tuesday, August 11, 2009

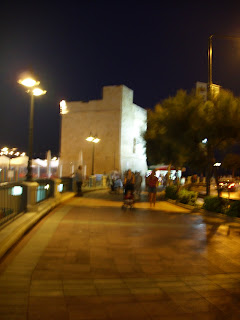
...and on to Tower Road...De Redin Tower

Our stroll took us up to Tower Road and, of course, It-Torri which is famous for giving this road its name. This is a very frequented area both by Maltese and foreigners alike. A great stretch of pavement (sidewalk) provides an ample and safe promenade for joggers, families with children or pet owners out to stretch their legs...both owners' legs and pets' : )
One can also see several seniors sitting on the double benches conversing with their relatives and friends.
This area brings back many cherished memories of when we were young and where we used to meet family and friends alike spending many happy hours talking, playing or enjoying a snack especially at the Tower which has been serving as an open air restaurant for as long as I can remember.
I'm sorry the photos are not very sharp, I had to make do without the flash since all I was getting were very dark pictures and my hand must have been shaking a little when I took these pictures.
The Tower is one of thirteen fortified watch towers built by Grand Master De Redin of the Knights of Malta...to read more about these towers click here...


Related Posts with Thumbnails